UFRAW Tutorial
LPROF is an open source application that creates ICC profile for cameras, scanners and monitors.
Photographing the IT8.7 Target
Capturing the target correctly is critical to producing a
good profile and is perhaps as large of a factor as 80% to 90% in
determining how good your profile will be. First I will talk about how
to create a general purpose camera profile. That is a profile that can be used for most
images where the light has a smooth spectrum (direct and shaded sun
light, cloudy, flash and tungsten light but not florescent light) and the
white balance of the actual scene is close to what was set on the
camera or selected/set in UFRAW.
Here are some tips for getting a good IT8.7/2 image:
Use a tripod.
Use an IT8.7/2 target that has a matte or
non-glossy surface. This will reduce reflections on the surface of
the target and make it easier to get a good profile. You can get good results using a glossy target but it requires a
great deal of care to prevent reflections from affecting the image. The
Wolf Faust "C1"
target which is an A4 size matte target is highly
recommended. This target is a larger size which
allows you to set up the camera farther away from the target which
helps prevent shadows and reflections from affecting the target.
It
also has a stiff backing that holds the target flat.
- Use a longer lens as this will allow you to place the camera farther away from the target.
Place
the target where the light is even and on a
surface where it is possible to change it's position. I use a
black music stand and some laundry pins to hold and position the
target. Even lighting is extremely critical.
Be sure to avoid reflections or shadows from near by objects.
Bracket
your exposures to make sure that you get a
good one. It is important that the target is not over or under
exposed. I recommend bracketing by the smallest increments
that your camera will allow. The correct exposure should be
about 1/3 to 1/2 stop below where there are blown out patches.
For
older versions of LPROF (1.10 and earlier) it was critical that the
camera be setup in a way
that is well centered and square to the target. In this
release of LPROF the user interface for placing the picker template is
much improved and this is no longer nessesary. But for images
that are poorly squared it may require making adjustments when placing
the picker template in LPROF. So try to get the camera square to the target.
- Lighting
must also be of a type that does not exhibit spikes or dips in the color
spectrum. Because of this florescent lighting is not suitable
for creating a general purpose camera profile. Don Hutcheson of
Hutch Color has written that, at least with some targets, sun
light and digital cameras will exhibit
significant amounts of metamerism (color shifts). Don recommends
shooting the target using tungsten lighting to minimize
metamerism. I have found that with the Wolf Faust target and my
camera (a Nikon D70) that sun light works well. So you may have
to try different things to find what works best for you. If you
find that your target/camera
combination will not work well in sun light you might try using tungsten
light.
Process the Target Through UFRAW
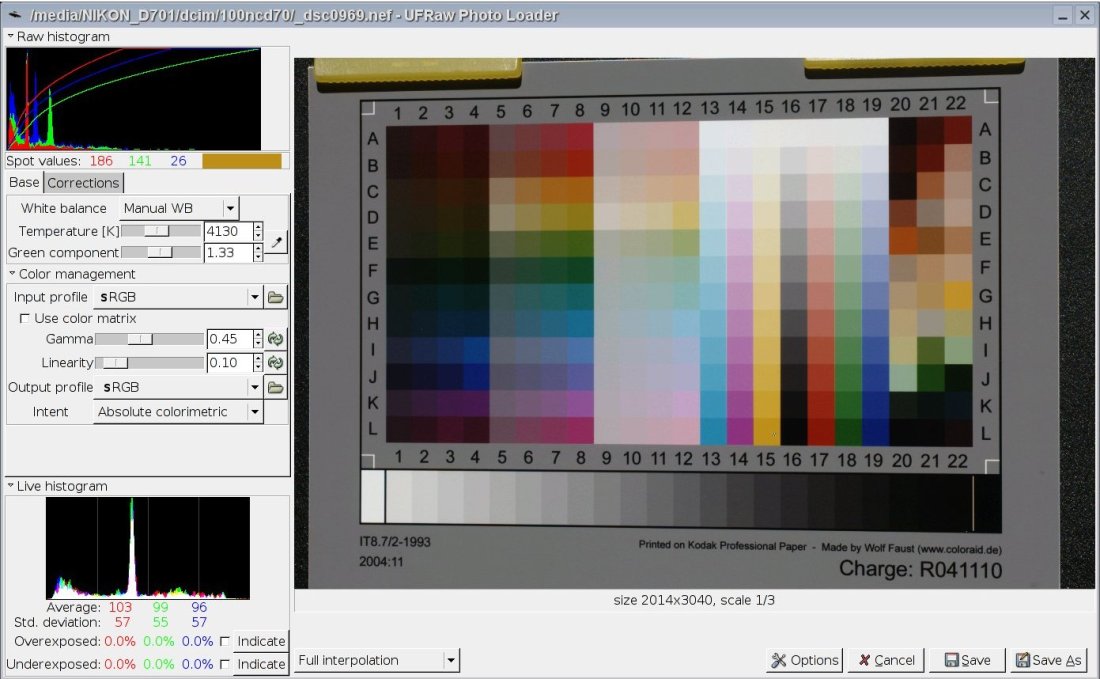
Open the raw file in UFRAW. Set all of the controls to
the default settings as a starting point. White
balance should be correctly set for the type
of lighting you used when photographing the target. Direct sunlight,
cloudy, shade or
incandescent are all good. Do not use fluorescent lighting. There
are way too many variables to get results suitable for general purpose
usage. Start out with gamma set to 0.45 and linearity set to
0.10.
In the corrections tab set exposure to 0.00 and
saturation to 1.00. Do not use Black point
compensation or a camera curve. All of these are the default settings.
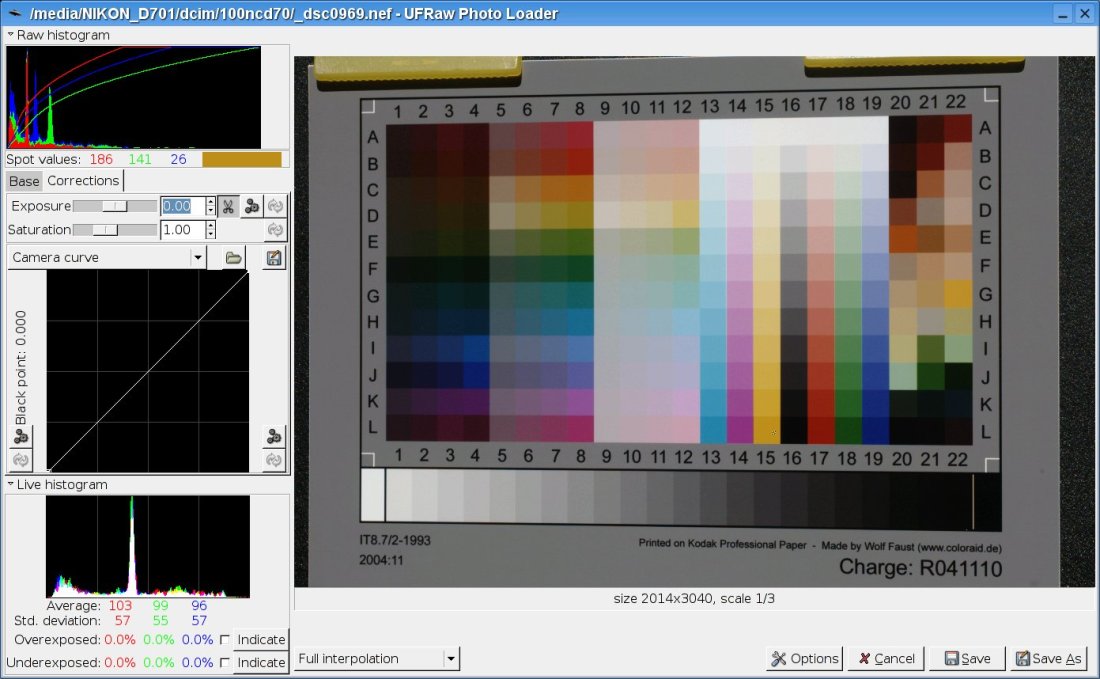
Then click in the patch in the lower left corner (the lightest gray
patch) to display the spot RGB values and increase/decrease exposure until the spot value readings are between
210 and 230. But make sure that no readings anywhere on the target are above 245 to 250. The
patches at A13-19 can be brighter than the lightest gray patch so check
these very carefully for any spot values that may be over 245 to 250. This
controls how bright your images will be when using the profile created using this target. If
your images are too bright then make the target brighter and vis versa.
But these setting should get you in the ball park. Also
remember that is it critical that no spot values anywhere on the target
are 255 so this limits how much exposure compensation you can use to
darken your images with the profile.
Now click on the DMAX patch (lowest patch on the right) and
check it's spot values. This should have RGB values between 10
and 20 and it's spot values should be clearly different from the
patch(s) next to it. If the spot values of the DMAX patch are
close to zero then decrease the setting of the linearity slider.
If the DMAX patch has spot values much higher than 20 increase the
setting of the linearity slider. Go easy this should be some
where between 0.05 and 0.15 in most cases. If the spot values of
the DMAX patch and the patch(s) next to it are not different then
either your camera does not have enough dynamic range to capture these
darker colors or the image was under exposed.
You can also check how even your lighting was by checking the spot
values around the gray borders of the target image. These should
not vary much as you check different locations on the image.
Set both the Input Profile and the Output Profile to sRGB and Intent to
Absolute colormetric. This will prevent UFRAW from doing any
color transformations in the process of creating the image from the raw
photograph of the target. This is exactly what you want for
processing a target image to be used for creating profiles.
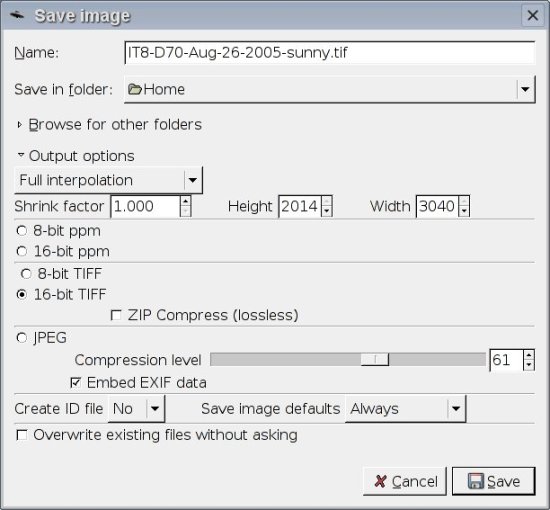
Now click the Save As button to save the target image as a 16 bit TIFF
file. Do not save it as a JPEG image as this will result in poor
quality profiles.
Create the Profile
Now you have the target image that will be processed by LPROF to make a profile for your camera. Please see Camera and Scanner Profiler Tab for details on how to create the profile.
Using the Profile
To use this profile in UFRAW you will need to open a RAW file and
select this new profile as the input profile. UFRAW will initially set
gamma to 1.0 and linearity to 0. Reset these to 0.45 and 0.10 (or
to exactly what you used when converting the raw image of the target) and
adjust exposure to 0.0. For your output profile select a working space
profile such as AdobeRGB or even better a profile with a larger gamut
such as BetaRGB, PhotoGamutRGB or ProPhotoRGB. Stay away from sRGB as
this has way too small of a color space to preserve all of the gamut that most digital
cameras can capture. Set white balance to Camera (assumes you set the
correct white balance when shooting the image) or select the correct white balance setting
for the lighting you used to shoot the image.
Making Profiles for Specific Lighting Conditions
Making color profiles for specific lighting conditions is a variation
of the above. The hardest cases and the ones with the biggest payoff
involve florescent lighting. There are a number of problems that you
must deal with to get good profiles for this type of light.
First
different lights can vary significantly in color temperature. In fact
the color temperatures for florescent lights range from around 2700K
(very common) to around 9300K (not common). Therefore the
florescent white balance setting(s) on most cameras are all but useless. Secondly florescent
lights that are not high CRI (Color Reproduction Index) lights (almost all of them) will have
very large spikes in the color spectrum. Where these spikes are located
and how large they are varies depending on the manufacturer, the model
of the light and possibly other factors such as age and room temperature.
My
experience is that I need to go through a
2 stage process when shooting the target. First create a custom white
balance setting before shooting the target so that the white balance
that was
used in the right ball park and also so that this white balance information
is part of the
data in the raw image file. For this I carry and use a gray card.
See the documentation for your camera for details on setting it's white
balance. Then shoot the target being careful to get even lighting. When
running
the target through the raw converter be very careful to make sure
that you use the same white balance setting as the target was shot with
ie. the custom white balance I set at the shoot. And of course
everything else above about how to raw convert the target and how to
create and use the profile applies.
This should also work
with other lighting conditions where the camera white balance presets
are not correct and/or where the light has strange characteristics like
spikes or drop outs in the spectrum.
Copyright © 1998-2005
LPROF. All Rights Reserve